


Escape the crowds during the W-trek: our 5-day hike in high season
- Oscar & Marjolein

- Jan 26
- 15 min read
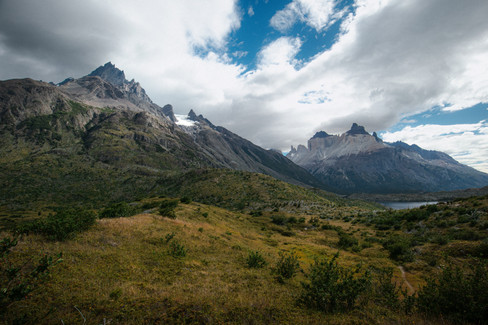
The W-trek in Torres del Paine is perhaps the most famous multi-day hike in Patagonia, and according to many travelers, even in all of South America. Every year, thousands of hikers flock to this national park in Chile to see the iconic glaciers, turquoise lakes, and jagged mountain peaks. It can get quite crowded here, especially during the high season (December through February). Yet we decided to hike the trail during this very period. Not because we like crowds, but because the weather is relatively stable then. Our challenge: to hike the W-trek while still experiencing as much peace and quiet as possible. By planning our route smartly, starting early, and organizing some stages differently than most hikers, we managed to do this surprisingly well. In this article, we share our 5-day route, practical tips, and preparations for the W-trek.

The W Trek in Torres del Paine: Our 5-Day Itinerary
The W Trek gets its name from the shape of the route: a large W through Torres del Paine National Park. We completed the trek in five days, hiking from west to east. Because of this direction and daily schedule, we often found ourselves just ahead of or behind the largest groups.
Our route looked like this:
Day 1: Paine Grande Campground → Mirador Grey Glacier → back
Day 2: Paine Grande Campground → Francés Campground
Day 3: Francés Campground → Mirador Francés & Mirador Británico → back
Day 4: Francés Campground → Sector Central Campground
Day 5: Sector Central Campground → Mirador Las Torres Base → back
In total, the W-trek is about 75 to 80 kilometers, depending on which additional viewpoints you visit.
How We Avoided the Crowds on the W Trek as Much as Possible
While planning, we noticed that many people hike the W Trek following roughly the same schedule. As a result, large groups gather on certain sections of the trail at specific times.
With a few simple choices, you can partially avoid this:
1. Start early in the day: Most day hikers at the famous viewpoint near Base Torres start around 9:00 a.m. By leaving earlier, you can often hike for hours in relative peace.
2. Break up the route differently: Many hikers combine certain sections into a single day. We, on the other hand, split them into two quieter days.
3. Hike against the flow: By hiking from west to east, we arrived at the popular viewpoints early or late in the day in several places. The result: on some parts of the trek, we practically had nature all to ourselves.
What do you need to arrange in advance for the W Trek (and O Trek)?
1. Book overnight stays at the campsites
Perhaps the biggest challenge of the W Trek isn’t even the hike itself, but booking the campsites. These reservations are mandatory. Without booked accommodations, you are not allowed to enter the park for a multi-day trek. Our advice: book your campsites as soon as you know when you want to hike the trail. Especially during the high season (December through February), spots are often fully booked months in advance. So don’t wait too long.
Langs de W-trek (en O-trek) zijn de campings verdeeld over twee organisaties:
Vertice Patagonia: beheert onder andere de campings bij Grey en Paine Grande
Las Torres Patagonia (voorheen Fantástico Sur): beheert de campings aan de oostkant van het park, zoals Central, Chileno en Cuernos
Along the W-route (and E-route), the campgrounds are managed by two organizations:
Vertice Patagonia: manages, among others, the campgrounds at Grey and Paine Grande
Las Torres Patagonia (formerly Fantástico Sur): manages the campgrounds on the eastern side of the park, such as Central, Chileno, and Cuernos
Dit betekent dat je je overnachtingen via meerdere websites moet boeken om je volledige route vast te leggen. Dat kan best een puzzel zijn. Je wilt dat alle overnachtingen netjes op elkaar aansluiten, maar als één camping op jouw gewenste datum vol zit, moet je soms je hele schema aanpassen.
Our advice: use the Torres Hike website to get an overview of availability at the various campsites. That makes planning a lot easier. Keep in mind, however, that Torres Hike charges an additional fee when you book through their platform. You can save these costs by using the site only to check availability and then making your reservations yourself through the official websites of the campground organizations: Vertice Patagonia and Las Torres Patagonia.
At most campsites, you can choose from several options:
a spot for your own tent
a rental tent that’s already set up for you
or a refugio (a mountain hut with a dormitory)
Chances are you’ll be shocked by the prices (we were, too). For extras like a sleeping pad, sleeping bag, or pillow, you’ll also have to pay a hefty amount on top of the campsite fee. That’s why we decided to rent our sleeping bags in Puerto Natales from the rental company Day Zero. There, you can rent high-quality gear at a reasonable price. A major advantage is that you only pay for the days you actually use the gear. We were able to pick up our sleeping bags the day before the trek and returned them the day after completing the W-trek. To give you an example: Renting a sleeping bag at the campsites during the W-trek costs around €40 per person per night. Through a rental company in Puerto Natales, we paid about €7 per person per night. That’s quite a difference.
The only downside to renting gear is that you have to carry it yourself during the trek. That’s why we chose to rent the sleeping pad at the campground instead. We didn’t need a pillow: we made our own by putting our jacket in a pillowcase.
One last tip for preparation: if possible, bring dried food from home. At every campsite, you can book dinner and breakfast (and sometimes a packed lunch), but the prices for these are quite high. Dried food is light to carry, and all you need is boiling water and a spoon or spork.
You can get free boiling water at all campsites, so that makes it extra easy. We ended up buying our dried food and snacks in Puerto Natales at Emporio de Autor Dos Peces PUQ. It’s a wonderful store with great products, but it’s also quite pricey. So by bringing food from home, you can save a lot of money.

2. Entrance ticket for Torres del Paine National Park
In addition to your campground reservations, you’ll also need an entry ticket for Torres del Paine National Park. You can purchase this ticket in advance online via the national park’s website (CONAF). If you’re hiking the W-trek or O-trek, opt for a multi-day pass (3+ days). This is more expensive than a day ticket but is required if you’re staying in the park for multiple days. We recommend purchasing your ticket in advance. At the park entrance, you’ll need to show both your ticket and your campground reservations. If everything is already arranged, you can proceed without any hassle.
Tip: Download or take a screenshot of your ticket and reservations before entering the park. Cell service is virtually nonexistent in Torres del Paine.
3. Ticket for the catamaran from Paine Grande to Pudeto (or vice versa)
It doesn’t matter which direction you hike the W-trek: your starting or ending point will almost always be near the catamaran. This boat sails across Lago Pehoé between Pudeto and Paine Grande, connecting the road network to the W-trek trail.
Most hikers first take the bus from Puerto Natales to Pudeto. From there, you board the catamaran to Paine Grande, where one of the trail’s starting points is located. If you hike the W-trek from west to east, you’ll end up at the visitor center near Hotel Las Torres. If you hike it from east to west, your trek ends at Paine Grande, and you’ll take the catamaran back to Pudeto. The catamaran runs a few times a day and usually connects with the buses to and from Puerto Natales. Reservations are often not required, but during high season it may be wise to book your spot in advance.
Tip: Be sure to check the departure times for the boat and the shuttle bus in advance. If you miss the last catamaran, you’ll have to wait until the next day. The shuttle bus and catamaran (2026) schedules are listed below.
Shuttle Bus and Catamaran Schedule (2026)
Shuttle bus from the visitor center to Laguna Amarga | Price shuttlebus: 4.500 Argentinian peso's in cash Time to Laguna Amarga: 20 minutes | Catamaran Pudeto to Paine Grande (27.000 Argentinian peso's, time: 30 minutes) | Catamaran Paine Grande to Pudeto (27.000 Argentinian peso's, time: 30 minutes) |
8.00 | Connects with the bus from Puerto Natales to the catamaran | 8.30 | 9.20 (high-season) |
10.30 | Only in high-season | 10.30 | 11.20 |
14.00 | Connects with the bus to Puerto Natales | 16.15 | 17.00 |
16.00 | Connects with the bus from Puerto Natales to the catamaran | 18.00 | 18.40 |
19.00 | Connects with the bus to Puerto Natales |
Waar verblijven in Puerto Natales?
De dag voordat we naar het Torres del Paine National Park gingen, verbleven we in Puerto Natales. Dit is een van de grootste plaatsen in de buurt van het nationale park en een populaire uitvalsbasis voor trekkers. Met onze campervan stonden we op camping Guïno. Dat vonden we een fijne plek: vriendelijke medewerkers die met je meedenken over de organisatie rondom de W-trek, een paar knuffelige honden en prima voorzieningen.
Where to stay in Puerto Natales?
The day before we headed to Torres del Paine National Park, we stayed in Puerto Natales. This is one of the largest towns near the national park and a popular base for hikers. We parked our campervan at Guïno Campground. We really liked it there: friendly staff who help you plan your W-trek, a couple of cuddly dogs, and excellent facilities.
Day 0 – Preparation
This day was all about preparation. In the evening, we packed our bags. We decided on one large backpack and one daypack. We can leave the large backpack at the campground on some days; the daypack is for everything we need along the way. On the advice of several people, we drove to the national park’s welcome center that evening. Here, you can park your campervan and “wild camp” in the parking lot. The big advantage: you can start early, and at the end of the W-trek, you’ll be right back at your car (if you walk it from west to east).
Day 1 - From Paine Grande Campground to the Grey Glacier Viewpoint and back
Distance: 15.5 kilometers
Elevation gain: 730 meters
Our plan seemed foolproof. In the morning, we would take a shuttle from the parking lot to the bus stop at Laguna Amarga. From there, we’d take the bus to the catamaran, and the catamaran to the starting point of our hike. According to several people, there were multiple shuttles per hour. That’s what it said online, too. But you can probably guess how it went: things turned out differently. At 8 a.m., we were at the welcome center, where the woman behind the counter told us the shuttle had just left. The next one wasn’t until 10:30 a.m., and then we’d miss the catamaran. So that didn’t match what we’d been told earlier, and it threw our plans into disarray.
We were then advised to drive to Laguna Amarga to catch the bus to the catamaran there. Following her advice, we bought tickets and were told we could park the car there for several days. That turned out to be incorrect as well. We weren’t allowed to leave the car at Laguna Amarga. Parking was only permitted at the welcome center or at the catamaran boarding area. So: we bought tickets for nothing and still had to drive to the catamaran. This cost us over an hour extra. Not an ideal start to our first day, but hopefully this info can help others. If you know the correct times and boarding locations, this part of the trip can go a lot more smoothly.
Fortunately, we arrived at the catamaran well ahead of time. We had bought our tickets weeks earlier. You can also buy them on the spot, but there has to be space available. When we left, we saw people standing on the pier who didn’t have tickets and weren’t allowed to board. The next boat doesn’t leave until the end of the day, so you won’t be able to hike that day. The crossing takes about half an hour. Along the way, you get a preview of the landscape you’ll be seeing in the coming days. Around 11:00 a.m., you arrive at the Paine Grande campground. Check-in isn’t available until later, so we left our large backpack in a locker and set off lightly packed on our hike toward the Grey Glacier.
The weather was lovely: sunny, with a bit of wind, but nowhere near as fierce as Patagonia can be. We quickly reached the first viewpoint. The Grey Glacier is part of the South Patagonian Ice Field, the same enormous ice mass that also includes the Perito Moreno Glacier. Along the way, we walked through the “ghost forest,” an area that burned down completely in 2012. The bare, charred trees give it an almost surreal atmosphere.
At the viewpoint, there are two large rocks from which you can look out over the lake toward the glacier. It’s usually very windy here, but today it was almost completely calm. We sat here relaxing for a while and then decided to walk a bit further. We filled our bottles at a small waterfall. The water in the park comes directly from the glaciers and is safe to drink, which is ideal because you don’t have to carry liters of water with you all the time.


Back at the campground, we checked in and were assigned our tent. Around 19:00., we sat down for dinner, which was a buffet. After that, we turned in early.


Day 2 - Paine Grande Campground to Francés Campground
Distance: 9.15 kilometers
Elevation gain: 355 meters
We were able to take it easy today. With a stage of about 9 kilometers, we didn’t need to rush, especially since we couldn’t check in at the next campsite until 14:30. Breakfast was served until 9:00, so we sat down just before that. We also picked up our lunchbox for the day at the restaurant.
Most people hike from Paine Grande Campground via the Francés and Británico viewpoints to Francés Campground in a single day. That’s possible, but it requires walking at a brisk pace and not stopping too often. When planning, we deliberately split the route over two days so we’d have more time to enjoy the scenery along the way. So today we’d head straight to the campground, and tomorrow we’d visit the viewpoints.
We agreed to take a short break roughly every 3 kilometers. Normally we stop mainly for lunch or photos, but now, thanks to those extra stops, we discovered all sorts of small, beautiful spots. A stream to refill our water, a hidden little lake, and a shady spot in the forest for lunch. It was very hot today, and with heavy backpacks, that made it feel extra tough. So we were actually quite happy with this relatively short day of hiking.


We arrived at Camping Francés at 14:30, just in time to check in. The tents here are a kind of roof tent mounted on poles against the slope in the woods, so that many tents can fit into a small space. The spot was beautiful. The only downside: you had to walk quite a distance through the woods to get to the restrooms. You wouldn’t want to do that at night in the dark…


In the afternoon, we took a hot shower and picked up our meal kit. The food is prepared in the refuge’s restaurant and then brought to the campground.
Day 3 – From Camping Francés to Mirador Francés and Mirador Británico and back
Distance: 16 kilometers
Elevation gain: 1,200 meters
Fortunately, we were able to leave our large backpacks behind today. Traveling light, we set off in the morning toward the Francés Valley. It was remarkably quiet on the trail. Most people start this day from Paine Grande and don’t arrive here until later in the day, so our schedule has worked out well so far.


The first viewpoint, Mirador Francés, was immediately impressive. From here, you’re standing directly across from the Francés Glacier. We’d seen glaciers before, but usually from above or from the side. It’s only when you’re looking straight at it from the front that you truly feel the grandeur of nature.


We then continued on to Mirador Británico, which was a bit further away and involved some extra climbing. The wind picked up a bit, but fortunately it stayed dry. Around lunchtime, we reached the farthest point of the route. From here, you have a panoramic view of the entire valley, surrounded by jagged peaks. It was a bit bleak because of the wind, so we kept our lunch quick and simple.


On the way back, we encountered a lot of oncoming traffic. You’re allowed to enter the Francés Valley until 1:00 p.m. This is likely due to the risk of avalanches and falling ice in the afternoon. At the end of the day, large chunks of ice sometimes break off the glacier and come tumbling down.
By late afternoon, we were back at the campground. We picked up our meal kit again. This time, we took the dessert—cheesecake pudding with calafate sauce—with us for a short evening walk. At a viewpoint a fifteen-minute walk away, we looked out over the Francés Glacier once more. We stood there for a while watching the falling ice blocks, accompanied by that deep, rumbling sound. Impressive to see, especially from a safe distance.
Day 4 - From Camping Francés to Camping Sector Central
Distance: 17 kilometers
Elevation gain: 650 meters
It rained all night long. Every time we woke up, we hoped the alarm hadn’t gone off yet. But at 5:00, it was time. Why so early? We had a mission today. We wanted to get to Sector Central on time, because a shuttle leaves there at 4:00 p.m. for the bus stop. From there, a bus goes to the catamaran. Our van was still parked there. We’re going to pick it up and move it to the welcome center, so we can do our last hike tomorrow without any stress.
Breakfast at Camping Francés isn’t served until 7:00, but at the refuge we could already get something to eat between midnight and 6:00 After that, we packed our bags with rain covers and put on our own waterproof clothing. Still in the dark and in the rain, we set off.
Today’s route was very diverse: forest, pebble beaches, and open plains. Due to the heavy rain, some rivers had overflowed their banks. Normally you hop from rock to rock, but now the water was so high and wild that you couldn’t get through without getting wet. We kept looking for ways to cross without getting completely soaked.


Despite the bad weather, we actually had a lot of fun. We were all in the same boat and helped each other across. Our shoes really took a beating that day; the Gore-Tex membrane couldn’t handle all the water. We spent the rest of the day walking around with wet, soggy shoes and socks.


We arrived at Sector Central well ahead of time. The staff at the front desk were quite strict about the rules. We stood there looking like drowned rats, fifteen minutes before we were officially allowed to check in, but we really had to wait until 14:30. Luckily, it had stopped raining by then, so we could hang up our wet gear. The rain covers hadn’t kept everything dry: our sleeping bags and pajamas were wet too. After hanging them outside for a few hours, they were thankfully dry enough to wear again. At 16:00, we took the shuttle to pick up the van.


After that, we took a hot shower and got everything ready for our final day of hiking. The highlight: the view at Torres del Paine. Some campers set their alarms for 1:00 to catch the sunrise. We’re a bit more fond of sleep, though, so we set our alarm for 4:00.
Day 5 - From Camping Sector Central to Mirador Las Torres Base and back
Distance: 21 kilometers
Elevation gain: 1,423 meters
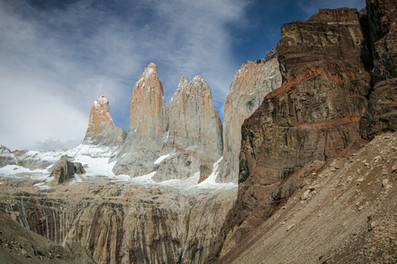
The final day of the W Trek, and also the last day of hiking on our entire trip through South America. But we’re ending on a high note: the view of the famous Torres del Paine.
For us, enjoying nature is closely linked to peace and quiet. The largest groups arrive around 9:00 by bus and then start their hike. We began walking around 5:00 so that we would be at the viewpoint around 9:00 That turned out to be a great choice. You’re then right in between two large groups: the sunrise group that leaves around 2:00 a.m., and the day tourists starting at 9:00. We hardly ran into anyone and were up there with just a handful of people. No long lines of hikers and no queues for photos.
We found the route to be moderate to challenging. The first few kilometers climb gradually, while the final stretch is much steeper and rockier. At 21 kilometers and over 1,400 meters of elevation gain, it’s a substantial day. But if you walk at a leisurely pace and take breaks along the way, it’s manageable for most people. This was also the only day you actually hike through the mountains. The other days, you mainly walk through the valley with views of the mountains. That variety is what makes it fun.


From up there, we had a perfect view of the Torres. They’re even more beautiful in person than in photos.


Within a few minutes, the weather took a turn: from blue skies and sunshine to clouds and strong gusts of wind. It got cold right away. We put on our warm jackets and began the descent. And there they were: the hordes of groups. The trail is narrow, so we often had to step aside. Hikers going uphill have the right of way, so the descent was slow.
Halfway down, we stopped for the lunch we’d brought with us. Later, it got quieter. You’re not allowed to go up toward the viewpoint after 15:00, so you hardly see anyone in the afternoon. We walked the last stretch back in peace and quiet.


Our big backpack was still at the campground. It felt like a gift to be able to just hop into our van after that. We drove back to Puerto Natales for our last night in our trusty campervan. We’re really going to miss that cozy little home on wheels.
Our thoughts on the W Trek
We thoroughly enjoyed the immense diversity of Torres del Paine. One day you’re walking alongside a glacier, the next through forests or open valleys. No two days are alike, and the rapidly changing weather keeps things full of surprises. We’re glad we hiked the route from west to east. This allowed us to avoid the biggest crowds in many places and hike in relative peace more often.
A major downside for us was how heavily regulated everything is. There is only one trail, and you have to stay on it. There’s no room to discover a hidden spot, swim in a lake, or climb a bit higher for a different view. You really miss that sense of freedom in nature here. We also found the prices to be extremely high. For five nights, we spent over €1,500 on lodging and meals. Compared to other treks in South America, we think this is a lot of money for what you get.
So the question “Is the W Trek worth it?” isn’t easy to answer. For us, an authentic experience is important—the feeling of being at one with nature and the local people. You hardly find that feeling here during the high season, and we knew that going in. In hindsight, we might have preferred to spend that budget on a lesser-known trek. But the nature here is so beautiful, and five days of hiking always does you good. So we certainly don’t regret it.


Comments